3D Printing: The Hobbyists' Microwave Oven!?
I've been 3D printing since I received a Creality Ender 3 Pro as a Christmas present in 2019. Since that time, I have not only heavily modified my printer, but I've also used it extensively for ham radio-related projects. I'll cover both in this post.
As any ham knows, ham radio is a hobby of hobbies. Not only that, but it also serves as an intersection between multiple non-ham-related hobbies. For example, I am continually combining ham radio with 3D printing and microcontrollers (think Raspberry Pi, Arduino, and that ilk). And I often find that 3D printing is really the enabler for many of those projects--it's literally the "glue" that holds projects together, gives them a protective cover, enables or simplifies the process of creating the project, etc. It's one of those technologies that until you have it readily available, you didn't know what you were missing. Maybe not as universal as a microwave oven, but for me, pretty darn close--it's the microwave oven of hobbies!
In this blog, I'll provide a quick overview of my current 3D printing setup, along with a list of ham radio-related projects I've created and/or printed over the past few years.
My current 3D printer setup
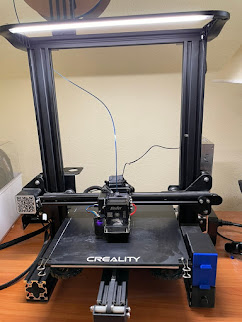
As I mentioned above, I started out with a stock Creality Ender 3 Pro back in late 2019. At that time, the Ender 3 was still pretty new and Creality was already establishing itself as a major player in the 3D printing market. Since that time they've released a flurry of new printers, along with many upgrades to their existing printers. The Ender 3 Pro, out-of-the-box, is definitely a capable printer, but as I came to find out, a few upgrades made a massive difference in the quality and speed of the prints that it generates. The upgrades I've added to the printer include:
- Replaced the stock build plate with a glass one (Creality branded): much improved prints, especially if I use Elmer "purple glue" to aid with adhesion
- Upgraded the stock printer controller with V4.2.7 board (much, much quieter printing)
- Replaced the stock build plate springs with stronger versions and larger handles (better bed leveling)
- Added an "auto leveling" sensor (first the BLTouch, then replaced that with the better CRTouch) (compensates for small deviations in the build plate's "level"
- Added a second z-axis motor (the stock Ender 3 only came with a motor on one side) (more stable prints, especially tall ones)
- Replaced the stock non-touch screen with the Creality touch screen...and then replaced the whole thing with Creality's Sonic Pad controller (better user interface and increased speed by offloading the print computations from the printer)
- Added a Logitech USB webcam which allows remote monitoring of the print along with AI-based print error detection (it can theoretically stop a print if it goes off the rails, although I haven't seen it actually do this yet)
- Replaced the stock printer firmware with "klipper" open source firmware, which works perfectly with the Sonic Pad
- Replaced the stock extruder and hot end with a Creality Sprite Pro direct extruder (faster printing, much easier filament load/unload, ability to print at higher temperatures with more exotic filament materials)
- Added an LED light bar to the top gantry, making it easier to see prints in progress, particularly when watching remotely
- Moved the printer control board and enclosure to the rear of the printer, opening up space in front for storage
- Printed storage drawers for the left and right side front of the printer, and a custom rear controller case
3D printing and ham radio

- Antenna wire insulators and winding spools
- Moxon antenna components (element connectors; note that I'm planning on remixing this to make it sturdier than the original design)
- CW paddle leg mount (remixed from this design)
- Numerous radio stands (FT5DR, GD-77 dual, Xiegu G90, IC-705)
- Xiegu CE-19 interface box
- IC-705 protective cover (since replaced with a Peovi cage)
- Microphone clips (IC-7300, IC-705)
- NanoVNA case
- Pi-Star hotspot case
- Callsign plaques (my own design)
- SOTA push-up pole guying rings (modified to fit my CARBON6 pole)

- QRP off center-fed dipole unun case plus winder
- Combination handle / carrying case for my Elk antennas log periodic VHF/UHF antenna
- Components (case, antenna tripod mounts etc) for an automated satellite tracking mechanism for the above antenna
- Improved tripod mount for my Alexloop "Hampack" magnetic loop HF antenna
- Backpack improvements for my ICOM IC-705 SOTA knock-off backpack similar to this one
- Common mode choke and housing
- A mobile mount for my IC-7000 that will allow me to quickly and easily move it in and out of the car
- Improved versions of many of the above projects, which were originally printed using PLA (not the best for durability and not UV resistant) using ABS, PETG or other strong filament types

Comments
Post a Comment